WordPress is a popular content management system that powers over 40% of all websites on the internet. With its vast library of plugins and themes, users can easily add new features and functionality to their website. However, when using plugins that are not available in your native language, you may need to translate them manually. This can be a daunting task, especially if you are not familiar with the plugin’s code. Luckily, there is a tool that can help you translate plugins easily – Loco Translate.
In this blog post, we will show you how to edit existing translations of a plugin using Loco Translate.
A Step-by-Step Guide: Plugin Existing Translations with Loco Translate
Step 1: Install and Activate Loco Translate Plugin
The first step is to install and activate the Loco Translate plugin. You can do this by navigating to your WordPress dashboard and clicking on “Plugins” in the left-hand menu. Then click on “Add New” and search for “Loco Translate”. Once you find the plugin, click on “Install” and then “Activate”.
Step 2: Locate the Plugin to Customize
Once you have installed and activated the Loco Translate plugin, you will need to locate the plugin you want to customize translations for. To do this, navigate to the Loco Translate menu in your WordPress dashboard and select “Plugins”. You will then see a list of all the plugins installed on your website. Find the plugin you want to customize and click on it.
Step 3: Create a New Translation Template
To customize an existing translation, you will need to create a new translation template. This is a copy of the original translation that you can edit without affecting the original translation. To do this, click on the “New Language” button on the top right corner of the page and select the language you want to customize.
Step 4: Customize the Translation
Now that you have created a new translation template, you can start customizing the translation. To do this, click on the “Edit” button next to the translation you want to customize. This will open a text editor where you can modify the translation. You can change specific words or phrases, or completely overhaul the translation as per your needs. Once you have made your changes, click on “Save” to save your modifications.
Step 5: Select the “Custom” file location
There is already a file under “System,” and we don’t want to save our file inside the theme because we are not the “Author.” WordPress updates do not affect the “Custom” folder in languages/loco. (Please keep in mind that all paths are relative to wp-content.)
Step 6: Just copy English source string
It is not necessary to include all of the translations in your file. Any original text that is not overridden will be used as a fallback.
Step 7: Use this file as template when running Sync
This instructs Loco Translate to use the original file to detect any changes in the available strings in the theme. The system translations file will effectively take the place of the missing POT file.
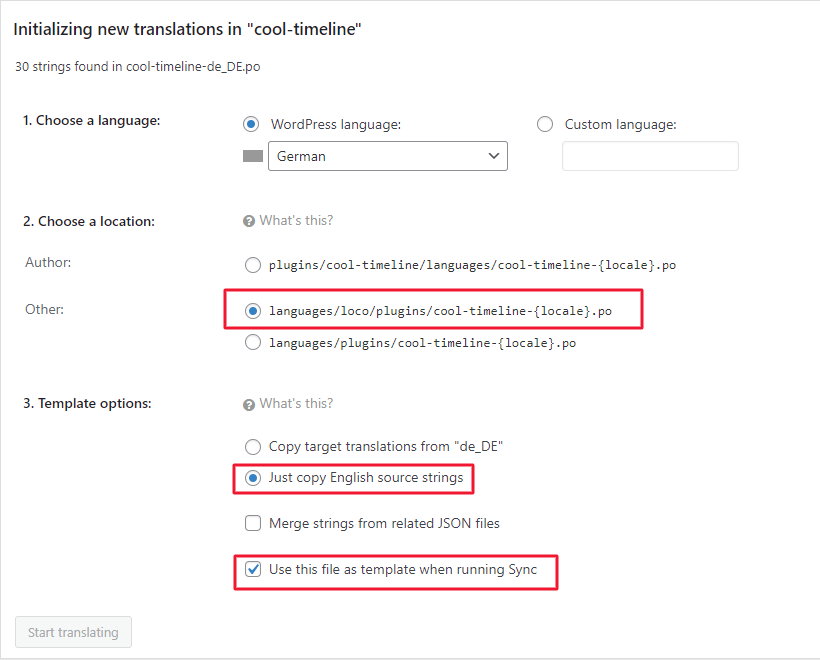
With these options selected, click “Start translating” to begin creating custom translations in the Loco Translate editor. These will be safely stored in a custom file that WordPress should not touch during system updates. The new file will now appear in your list of translations as follows:
Your file will be listed as “Custom” under the “Folder” column, in addition to the “System” version. Both files will be loaded, but your customised strings will take precedence.
Conclusion:
Translating plugins manually can be a time-consuming and complicated process, especially if you are not familiar with the plugin’s code. However, Loco Translate makes this task much easier by providing a user-friendly interface to edit translations. By following these simple steps, you can edit existing translations of a plugin with ease.