Multilingual websites are the future, and Polylang is a plugin that makes creating one easy. This post will show you how to install Polylang and add languages to your website.
What is Polylang?
Polylang is a multilingual WordPress plugin that allows you to create and translate your website into multiple languages. It’s ideal for people who have many different languages on their website.
Polylang uses the Tag Cloud plugin, which provides us with some basic functionality when translating our pages. This makes it easy for us to add translations and make sure they’re consistent throughout our site.
Installation of Polylang plugin
Installing and configuring the Polylang plugin on your WordPress site is a straightforward process. Follow the step-by-step guide below to get started:
Step 1: Accessing the WordPress Dashboard
– Log in to your WordPress site by entering your username and password.
– Once logged in, you will be redirected to the WordPress dashboard.
Step 2: Navigating to the Plugins Section
– On the left-hand side of the dashboard, locate the “Plugins” tab and click on it.
– A dropdown menu will appear. Click on “Add New.”
Step 3: Searching for and Installing the Polylang Plugin
– In the search bar located in the top right corner of the page, type “Polylang.”
– The search results will display the Polylang plugin. Click on the “Install Now” button next to it.
– WordPress will now install the Polylang plugin on your site.

Step 4: Activating the Polylang Plugin
– After the installation is complete, the “Install Now” button will change to an “Activate” button.
– Click on the “Activate” button to activate the Polylang plugin.

Step 5: Accessing the Polylang Settings Page and Configuring General Settings
– Once the plugin is activated, a new menu item called “Languages” will appear in the WordPress dashboard.
– Click on “Languages” to access the Polylang settings page.
– On the settings page, you will find various tabs for configuring different aspects of the plugin.
– Start by going through the “General” tab, where you can set the default language for your website and configure other general settings according to your preferences.
– Make sure to save your changes after making any modifications.
Step 6: Setting the Default Language for Your Website
– In the “General” tab of the Polylang settings page, locate the “Default Language” option.
– Choose the primary language for your website from the dropdown menu.
– This language will be used as the default language for your site’s content.
– Save your changes.
You have successfully installed and configured the Polylang plugin on your WordPress site. You are now ready to add additional languages, translate posts and pages, configure menus, and customize URLs using the Polylang plugin.
Adding languages
Adding languages to your WordPress website with the Polylang plugin is a crucial step in creating a multilingual site. Follow the steps below to add languages and configure language switchers:
Step 1: Accessing the Languages Section in Polylang
– Login to your WordPress dashboard.
– Locate the “Languages” menu item in the left-hand side menu and click on it.
– You will be directed to the Polylang settings page, specifically the “Languages” tab.
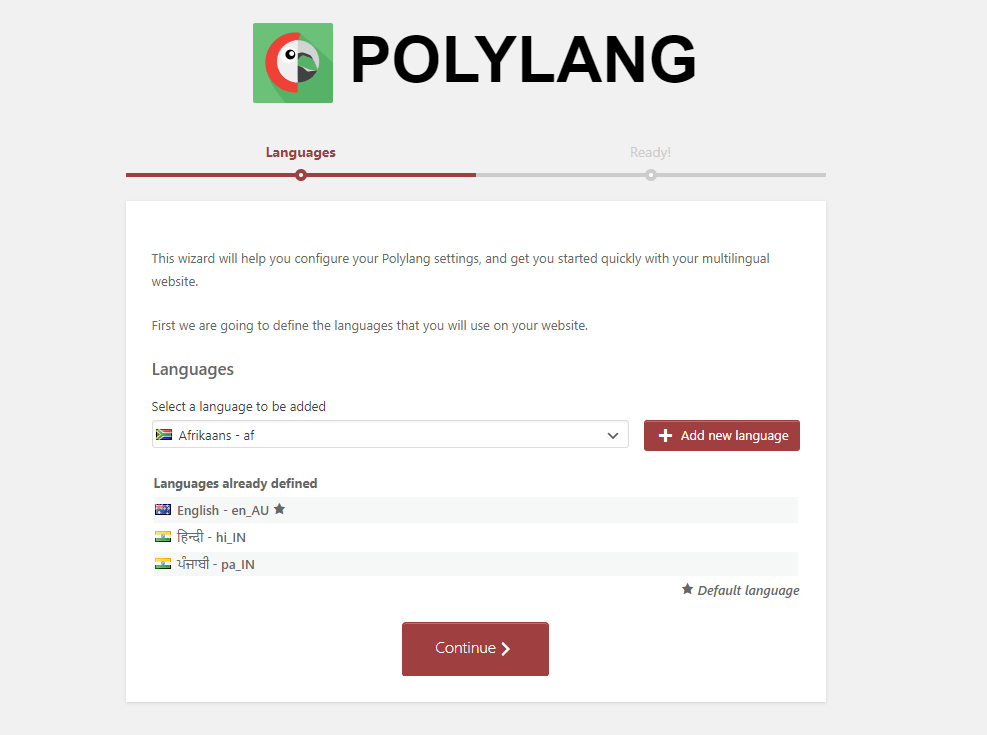
Step 2: Adding a New Language to Your Website
– On the “Languages” tab, you will find a list of languages already added to your site, if any.
– To add a new language, scroll down to the “Add new language” section.
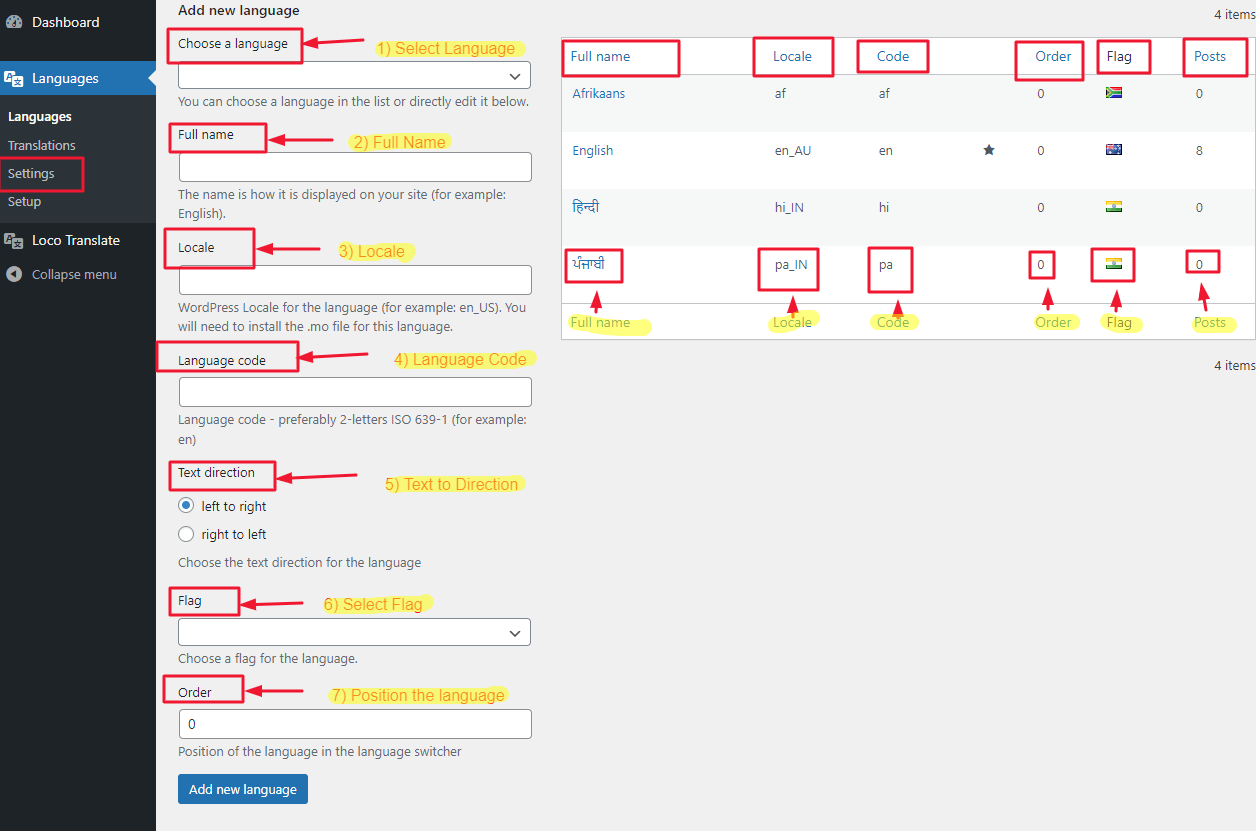
– Enter the language details, such as the language name, language code (e.g., en for English, fr for French), locale, and flag.
– Click on the “Add new language” button to add the language to your website.
Step 3: Configuring Language-Specific Settings
– After adding a language, you can configure language-specific settings by clicking on the “Edit” button next to the language in the list.
– On the language settings page, you can set the language-specific locale, flag, and other options according to your requirements.
– Save the changes once you have configured the settings.
Step 4: Setting the Language Switcher Options
– In the Polylang settings page, go to the “Settings” tab.
– Scroll down to the “Language switcher” section.
– Choose the language switcher type that you prefer. Polylang provides various options such as dropdown, list, flags, or a custom menu.
– Configure the display options for the language switcher, such as the position, order, and whether to display the current language.
– Save your changes.
You have successfully added languages to your WordPress website using the Polylang plugin and configured language switchers. Visitors to your site will now be able to switch between different language versions of your content using the language switcher you configured.
Adding translation to your posts and pages
Translating posts and pages with the Polylang plugin is a crucial step in creating a multilingual website. Here’s a step-by-step guide on how to translate your content using Polylang’s interface, along with tips for efficient translation management:
Step 1: Accessing the Posts or Pages Section in WordPress
– Login to your WordPress dashboard.
– To translate posts, click on “Posts” in the left-hand side menu. For pages, click on “Pages.”
Step 2: Creating Translations for Posts or Pages
– Locate the post or page you want to translate.
– If you haven’t translated it yet, you will see a “Translate” link below the post or page title. Click on it.
– Polylang will create a new language-specific version of the post or page.
Step 3: Translating Content Using the Polylang Interface
– Once you’re in the translation editor, you can start translating the content.
– In the editor, you will find fields for translating the post or page title, content, and any custom fields.
– Switch between the available languages using the language tabs at the top of the editor.
– Translate the content for each language, making sure to maintain consistency and accuracy.
– Save your changes after completing each translation.
Step 4: Managing Translations and Language-Specific Content
– To manage translations and language-specific content, go back to the posts or pages listing.
– You will now see a list of all available translations for each post or page.
– You can edit, delete, or create new translations from this listing.
– Make sure to keep track of your translations and regularly update them as needed.
Previewing your website in a browser window
If you’re using a browser, you can preview your website in a browser window.
This is a great way to see how your site will look in different languages and how it will translate into languages other than English.
Using the Polylang plugin, you can make your website multilingual.
The Polylang plugin is a great tool for creating multilingual websites. It allows you to translate your posts, pages, and custom post types into multiple languages. The plugin also provides translation support for WordPress shortcodes, so that you can create beautiful slideshows and other content editor options from within the interface of your website.

Conclusion
In conclusion, creating a multilingual WordPress website with the Polylang plugin is an effective way to reach a broader audience and provide a localized experience for your visitors.